This post may contain affiliate links. Read disclosure policy
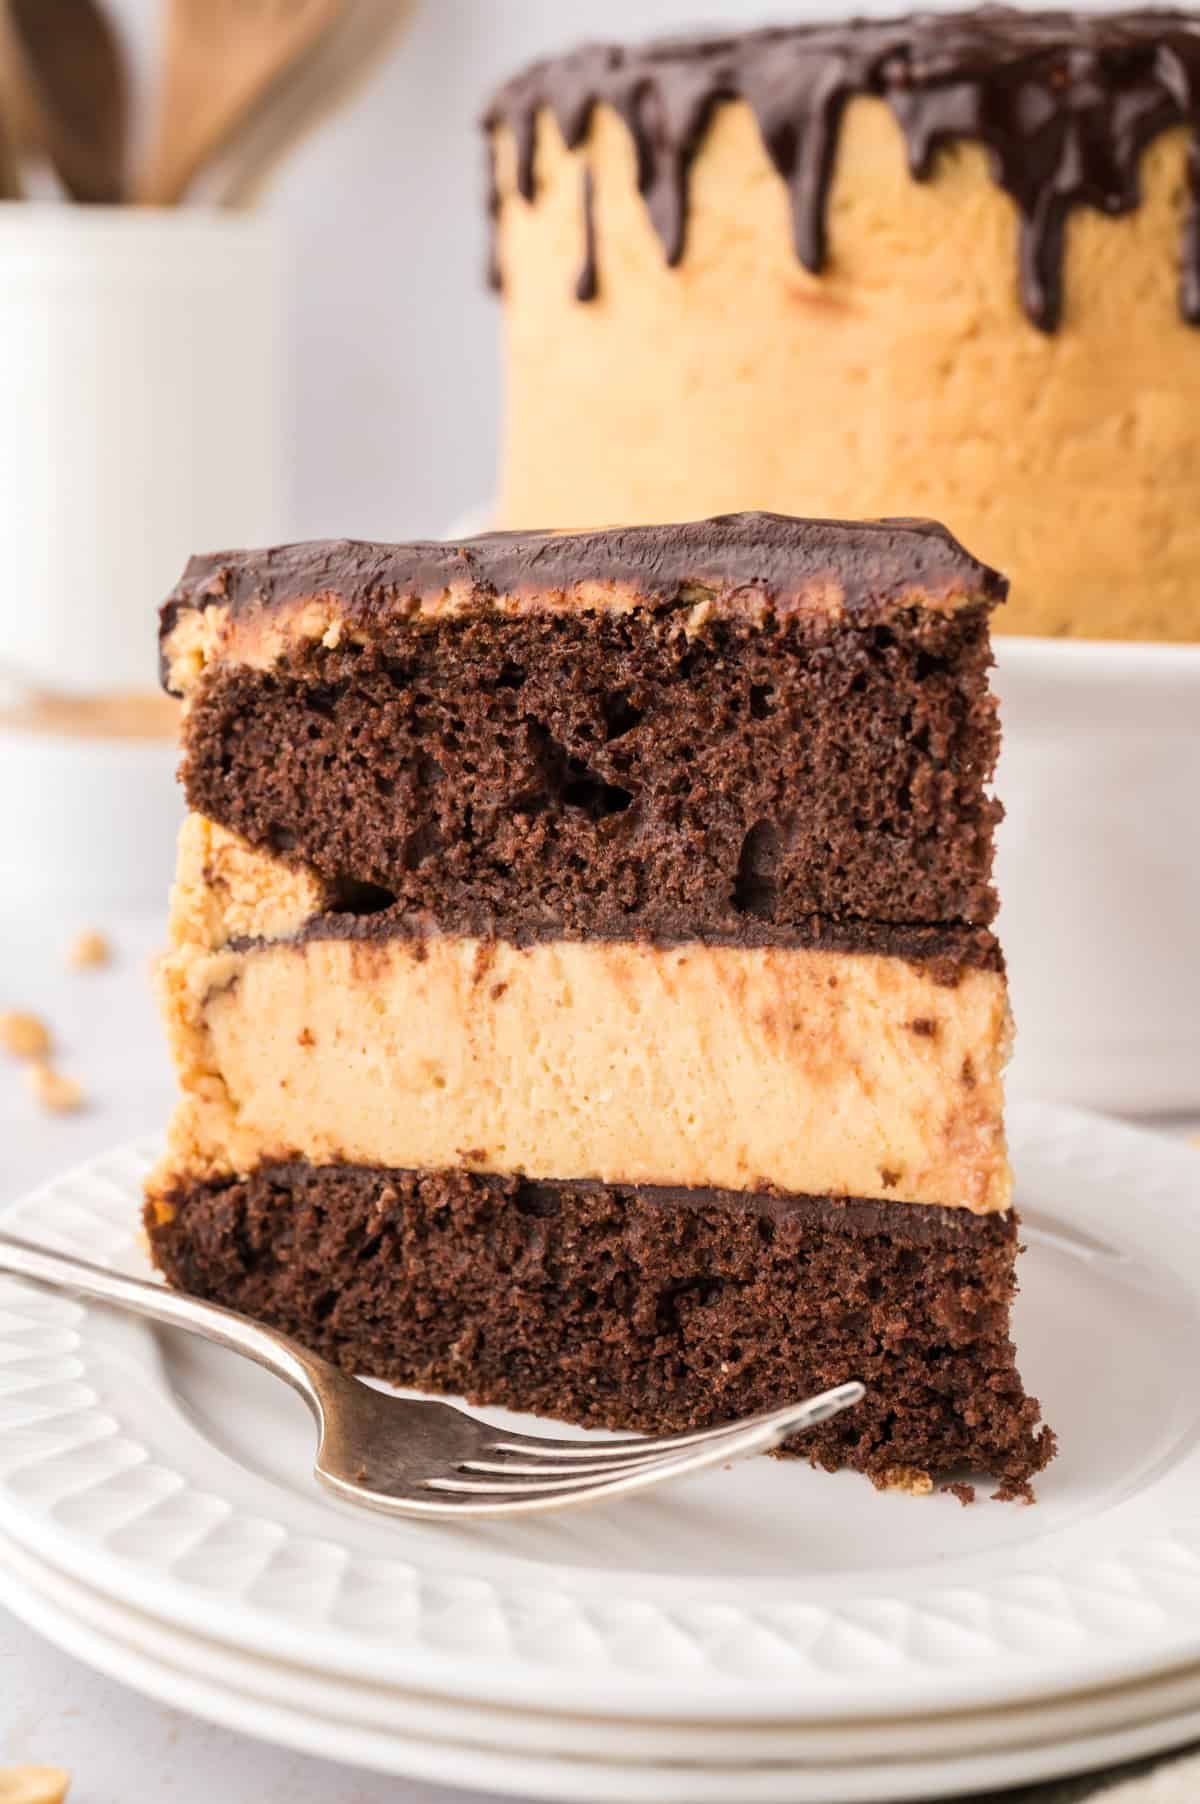
This Chocolate Peanut Butter Cheesecake Cake is the stuff dreams are made of. Rich chocolate cake with a center made of creamy peanut butter cheesecake! We top this off with a thick, rich peanut butter frosting and spread chocolate ganache over the top.
Is this cake really worth all the fuss? Yep. Completely.

Your New Cake Obsession
This cake is basically a dream come true.
Layers of chocolate cake (thanks, cake mix, you’re a lifesaver 🙏), a creamy peanut butter cheesecake (yes, I made it from scratch, because balance 🤪), and then it’s all topped with a thick peanut butter frosting (we’re trying to mimic a peanut butter ball here) and drizzled with chocolate ganache.
I mean, what more could you want? 🤷♀️
I know what you’re thinking: “Is this really worth all the fuss?” And my answer is, absolutely!
It’s more work than many of our recipes, because there are 4 distinct components, but it’s worth every second you’ll spend.
I make this Chocolate Peanut Butter Cake for my son’s birthday just about every year and have for the past 15 years. The kid (who is now turning 25) is obsessed.
♥ What We Love About This Recipe:
- Chocolate & Peanut Butter: America’s favorite combo! There is peanut butter throughout, all surrounded by rich chocolate cake – made easy with cake mix.
- Over The Top: This cake is honestly kind of insane. Instead of a plain chocolate cake, we’re throwing a cheesecake in the center. Instead of boring frosting, we made a thick, rich peanut butter frosting that tastes like a peanut butter ball. We didn’t stop there either – we finish it off with a chocolate peanut butter ganache that looks hard and sounds fancy but is actually the easiest part!
Ingredient Notes:
We include the full recipe down in the recipe card, but this section is helpful for a visual on what you’ll need and what swaps you may want to test out.
For the Peanut Butter Cheesecake:

Cream Cheese – Start with blocks of room temperature cream cheese for easy mixing! If your cream cheese is cold, your cheesecake will be lumpy no matter how much you try mixing out the lumps.
Peanut Butter – You can use any brand of creamy peanut butter that you like! You’ll want a processed peanut butter, such as Jif or Skippy. Don’t use a natural peanut butter where the oil separates.
Other – You’ll also need some all-purpose flour, eggs, and some milk (preferably 2% or whole milk).
For the Chocolate Cake:

Boxed Chocolate Cake Mix – Try to find a 15.25 ounce chocolate cake mix. The sizes keep shrinking, and any size should work, but we tested this with a 15 ounce mix. I like this one. You’ll also need the ingredients as called for on the box.
For the Peanut Butter Frosting:

Peanut Butter – Even more peanut butter! We’re using it as much as possible in this recipe so it’s going into the frosting too.
Butter – Start with room temperature butter for easy mixing.
Powdered Sugar – To sweeten up the frosting.
Heavy Whipping Cream – To thin up the consistency of the frosting a bit to help make it more spreadable. You can use more of this, or some milk, as needed to get it to the right consistency.
For the Chocolate Peanut Butter Glaze:

Chocolate Chips – We used semi-sweet chocolate chips for this but you could use milk chocolate or dark chocolate if you prefer. It’ll depend on the sweetness level you prefer.
Peanut Butter – Yep, more peanut butter! Hope you bought a big jar.
Light Corn Syrup- This is not the same as HFCS. You’ll find it in the baking aisle or here at Walmart.
Cream: The cream is going to make this rich, thick, and glossy.
See the recipe card for full information on ingredients and quantities.
How To Make the Peanut Butter Cheesecake Layer:

You’ll want to prepare the cheesecake a day in advance so it has time to chill before adding the chocolate cake layers. Beat together cream cheese, peanut butter, sugar, and flour and then the eggs one at a time. Stir in the milk.

Grease a 9 inch round springform pan very well as there is no crust. Pour the cheesecake batter into the prepared pan. Bake the cheesecake for 10 minutes at 325 degrees. Reduce the heat to 260 and bake for 50 minutes or until the center is just slightly jiggly.

Turn the oven off, crack the door open, and let it cool for an hour. Transfer to the counter to cool for another hour and then pop it in the fridge to finish chilling.
How to Make the Chocolate Cake Layer:

This part is pretty simple! Just prepare the chocolate cake mix according to the package instructions, or use a recipe for a homemade cake.

Pour the cake batter into two greased 9 inch round cake pans and bake per instructions. Cool completely before proceeding.
How to Make the Peanut Butter Frosting + Chocolate Ganache:

Cream together the peanut butter and room temperature butter. Add the powdered sugar and heavy cream, beat together until the frosting is smooth and creamy. Use milk or cream to get the frosting to a spreadable consistency.

In a double boiler or a bowl set over a pot of simmering water, melt the chocolate, peanut butter, and corn syrup. When melted remove from heat and whisk in the cream until the glaze is a smooth, creamy consistency.
Cake Assembly:

Place one layer of chocolate cake on a cake stand and top with 1/4 of the chocolate peanut butter glaze. Spread it to the edges.

Carefully remove the sides of the springform pan place the entire cheesecake upside down on the chocolate cake layer. Top with ganache and the second layer of chocolate cake.

Chill the cake in the fridge for 15 minutes to make it easier to work with and then spread the peanut butter frosting over it all to cover. The frosting should be somewhat thick, but you can thin it out as you like.

Microwave the chocolate glaze for a few seconds to soften it back up. Pour over the top center of the cake and use a spatula to spread the glaze to the edges so that it drips down prettily. We like to pop this back in the fridge for about 15 minutes before slicing.

Tools Needed:
This cake is a bit more in depth than a lot of cake recipes, but that doesn’t mean a beginner baker can’t nail it with the proper tools and a little love!
- Springform Pan: This pan is 100% necessary for the cheesecake layer. We use this one. The sides open up so that the cheesecake will release smoothly. Do not attempt to bake the cheesecake in a traditional cake pan.
- Offset Spatula: Not strictly necessary, but this makes smoothing the ganache and frosting so easy!
- Mixer: You can use a hand mixer or a stand mixer here, but you’ll want some sort of electric mixer for making the cheesecake and frosting layers.

Karly’s Tips & Notes:
We tested this recipe so many times before sharing it here, because, well…it’s an in-depth recipe and I want to be sure it turns out just perfect for you! Here are some of my personal tips:
- Cheesecake: We tested this peanut butter cheesecake with both a water bath and without. Highly recommend baking the cheesecake in a water bath to help prevent cracking. Our method for cooling the cheesecake also helps to prevent cracks. That said, if you get a crack in your cheesecake, no one is going to notice since it’ll be sandwiched between chocolate cake!
- Frosting: Have you ever had a peanut butter ball or a buckeye? They’re thick and rich and that was my inspiration when developing this recipe. The frosting is also thick, but you can add more cream (or a splash of milk) to thin it out so that it’s easier to spread.
- Double Boiler: I don’t actually have a double boiler myself. I just add some water to a small pot and bring it to a simmer. Place a heat safe mixing bowl over the top and pour in your chocolate. It works beautifully. I do lift the bowl periodically to release some steam, just to be safe.
More Chocolate Peanut Butter Recipes:
It’s no secret that I am obsessed with the combo of chocolate and peanut butter. I’ve developed loads of recipes featuring this combo to share with you. (Figuratively, of course. Not literally. I don’t share chocolate and peanut butter.)


Buckeye Cake
Ingredients
For the Peanut Butter Cheesecake:
- 16 ounces cream cheese room temperature
- 1 cup granulated sugar
- 1/2 cup creamy peanut butter
- 3 tablespoons all-purpose flour
- 4 large eggs
- 1/2 cup milk 2% or whole milk preferred
For the chocolate cake:
- 1 15.25 ounce chocolate cake mix prepared according to package directions (homemade works too, if you’re feeling adventurous) and baked in 2 9 inch round cake pans
For the Peanut Butter Frosting
- 1 cup creamy peanut butter
- 1/2 cup butter room temperature
- 4 cups powdered sugar
- 1/2 cup heavy whipping cream more as needed
For the chocolate peanut butter glaze
- 8 ounces semi-sweet chocolate chips
- 3 tablespoons creamy peanut butter
- 2 tablespoons light corn syrup
- 1/2 cup heavy whipping cream
Instructions
For the Peanut Butter Cheesecake:
- Bake the cheesecake one day in advance so that it has plenty of time to chill in the fridge before layering with the chocolate cake.
- Preheat oven to 325 degrees.
- Beat together the cream cheese, peanut butter, sugar, and flour until light and smooth and creamy. Beat in the eggs one at a time. Stir in the milk. Do not overmix as that will create cracks in the cheesecake.
- Grease a 9-inch round springform pan very well. There is no crust on this cheesecake, so it is imperative that you grease the pan so that the cheesecake will release from it easily.
- Pour batter into the greased pan.
- Wrap the bottom edges of your springform pan in foil. This protects the cheesecake from the water bath if you don't have a perfect seal on your pan.
- Place the cheesecake pan into a larger roasting dish and place it in the oven. Quickly but carefully pour hot water into the roasting dish to about 1 inch deep.
- Bake for 10 minutes at 325 degrees.
- Reduce heat to 260 and bake for 50 minutes or until just the center is just slightly jiggly.
- Crack open the oven door and let the cheesecake cool in the oven for 1 hour. Transfer to a cooling rack on the counter and chill for 1 more hour before covering with foil and refrigerating overnight.
For the chocolate cake:
- Prepare the cake mix according to the package or use a recipe for homemade cake.
- Bake in 2 9-inch round, well greased cake pans. Cool completely.
For the peanut butter frosting:
- Cream together the peanut butter and butter until light and fluffy.
- Add the powdered sugar and cream and beat together with your mixer on low so as not to throw powdered sugar all over the place. Once the powdered sugar is incorporated, increase the speed and mix until the frosting is smooth and creamy.
- The mixture will likely be fairly thick. Add in a bit more cream (or milk) as needed until it's spreadable. We want a fairly thick frosting so that it's mimicking a traditional buckeye, but it needs to be spreadable so that it doesn't tear the cake.
For the chocolate peanut butter glaze:
- In a double boiler or a bowl set over a pot of simmering water, melt the chocolate, peanut butter, and corn syrup. When melted remove from heat and whisk in the cream until it is a smooth, creamy consistency.
To assemble:
- Place one layer of chocolate cake on your cake stand and top with 1/4 of the chocolate peanut butter glaze. Spread to the edges.
- Very carefully remove the sides of your springform pan and place the entire cheesecake upside down on the chocolate cake layer. The bottom of the springform pan should now be on top of the cheesecake. Carefully slide a knife in between the cheesecake and pan bottom to loosen. If you greased your pan well this should be fairly simple and the pan bottom will easily lift off.
- Pour another 1/4 of the chocolate glaze over the cheesecake and spread to the edges.
- Top this with the second layer of chocolate cake.
- Place the whole cake in the refrigerator for 15 minutes to firm up.
- Cover the top and sides of the cake with the peanut butter frosting. Smooth it out as best you can.
- Microwave the chocolate glaze for about 5-10 seconds to soften it back up. Whisk well and then pour over the top center of the cake. Use an offset spatula to spread the glaze to the edges, letting it drip down in some areas.
- Serve immediately or store in the refrigerator, covered, for up to 4 days.
Tips & Notes:
Nutrition Information:
Original photo below:


Rebecca D says
This looks amazing. For some reason it would not pin or transfer an image. Please help : )
Teresa says
@Rebecca D, The same thing happened to me. You are probably clicking on the wrong ‘Pin’….look directly above and you will see another Pinterest link.
internet portale tre says
The programmer also may want to ensure that there is a
method of activating the program should something go wrong
with the authentication procedure that is being
built into the application. Link Building Services in Srilanka is one
of the best services offered by the expert SEO team.
Monitor until your SIM is activated then transfer your SIM in your China Phone.
Tiffany Merritt says
Looks so yummy! Wanted to let you know that I’m doing a round up of recipes that I can’t wait to try in the near future, and I’d like to include this one. I will be listing the name of your recipe, linked back to your site, as well as your site name. A photo will bein a collage format only, so that your picture cannot be “swiped” from my site. And there will be no information about the ingredients or recipe steps so that readers must come visit you if they want to know how to make it! This will go live on the 13th; please do let me know if you don’t want me to link to you for some reason. I hope it brings you a lot of traffic!
wealhtheow says
So just in case anyone else was wondering how this would work, I used natural peanut butter to make the frosting and it came out great! I probably had to use a little more whipping cream to get it to a good frosting consistency, but otherwise experienced no problems! The cake is on Day 2 and still looks good (no separation thus far). I didn’t try to make the cheesecake, though, so I can’t say whether natural peanut butter would work for that part.
Karly says
Thanks for the update!
wealhtheow says
This looks incredible! I can’t wait to make it! One question–when you say “creamy peanut butter” do you mean the Jif type, or the natural kind that just contains peanuts?
Karly says
I mean the Jif type. I think the natural version would separate too much. 🙂
Terri says
if you cream the butter and peanut butter really really well, the lumps will be non-existent
Michelle W says
I could seriously eat the picture! I’m pinning this one for sure. Thanks for ruining my diet (tic)!
Sarah says
This looks incredibly rich, but I bet it tastes amazing! As I was sitting here admiring the recipe during my study hall, I wonderously started to smell buckeyes. What are the odds of that? Must be my desire to have a piece…
Joanne @ Fifteen Spatulas says
OH MY FREAKIN GOODNESS I CANNOT WAIT TO MAKE THIS. And sorry for the obnoxious all caps, but I’m so excited lol.
Trish - Mom On Timeout says
This cake just looks crazy good Karly! Yummy!
Sue says
I made this for a special dinner. WOW…AMAZING!!!!! It was a lot of work, but so worth it. Everyone loved it and raved about it. Thanks for such an awesome recipe!
Kayleigh says
I LOVE THIS! I live in ohio (the bukeye state)
Russ Florack says
I just made this cake and it is amazing! Need a gallon of milk per slice, but well worth it! Thanks for sharing the recipe!!
Cathy O says
I made this cake for the first time, today, and entered in a baking competition. The cake was out of this world and got second place. Thanks for the recipe – total heavenly dessert!
Karah says
I had been searching for the perfect dessert to make for Easter for a while. Nothing was jumping out at me until I did a search for “chocolate” on Pinterest and found this.
I made it. And it was amazing. Pretty much exactly how I imagined it would be. I did add a bit more cream to the frosting and it was still hard to spread, but it was worth the trouble. Without a doubt. My husband is having another slice right now and he just told me this ranks up there as one of the best things I’ve ever made (and we’ve been married for 14 years!). So THANK YOU for this recipe! So worth the time and effort involved.